Share


Kentico has out of the box functionality that allows you to run and analyze cross-channel digital marketing campaigns without the need for any third party modules. Campaigns are set up around conversion points and actions are weighted according to values you determine important. This allows you to gain insight into the effectiveness of your campaigns and make the appropriate adjustments to them to increase conversions.

Let's run through an example of how this works.
Lets say you want to run a social media campaign where your goal is to get people to give you their email addresses. Your promotion is called "Everything in the store is FREE" and in order to qualify the user must land on a landing page and successfully fill out a form.
The First step is to navigate to the Campaign Management application and create a New Campaign and add UTM parameter for the Campaign. The name you give the UTM Campaign is completely up to you but we recommend using something that is easily identifiable because this is parameter is going to be used to identify all the URLs in the campaign.
In our situation we will name our UTM Campaign = EverythingIsFREE
Next step is to add all of the materials you would like to associate with the campaign to the Content Inventory. This includes any content or pages from your site, emails or any external promotional channels. In our situation we would like to include social media links as well as pages from our website. We would then use the URL builder and add UTM Source and UTM Medium parameters to these links. A Twitter link for example would have a UTM Source = Twitter; UTM Medium = Social.
Once you have the content inventory organized you will then need to set up conversions for the campaign. These conversions will determine the success of the Campaign. You need a minimum of one conversion to run a campaign but you can add as many as you like. To add a conversion you can simply click Add Conversion in the Conversions section and open the Define Conversion dialog where you can select the type of visitor activity you would like to track. In our situation we would add a conversion for someone filling out a form to qualify to for our "Everything in the store is FREE" promotion.
After you have saved your conversions and defined your campaign you are now ready to schedule it to go live. This is done in the Schedule tab. You can stop your campaign at any time and add elements to the content inventory as the campaign is running. The campaign management application is also equipped with all the analytics you could need to analyze data quickly.
Having everything in one place is extremely convenient and having this built into the CMS makes making changes easy.
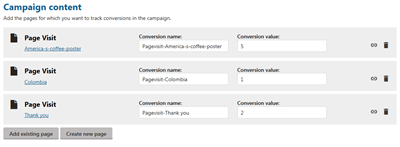
fig 1. Campaign Content
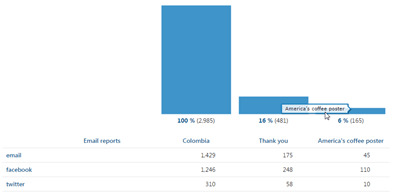
fig 2. Campaign Reports
https://docs.kentico.com/k10/on-line-marketing-features/managing-your-on-line-marketing-features/campaigns
Content Personalization With Kentico
Marketing Automation With Kentico EMS
How Does Campaign Management Work?
In order to set up a campaign in Kentico you need to set up your UTM parameters, define your conversion(s) and associate materials with the campaign by adding them to the content inventory. Once you have done all of these steps you can then schedule the campaign to run.Let's run through an example of how this works.
Lets say you want to run a social media campaign where your goal is to get people to give you their email addresses. Your promotion is called "Everything in the store is FREE" and in order to qualify the user must land on a landing page and successfully fill out a form.
The First step is to navigate to the Campaign Management application and create a New Campaign and add UTM parameter for the Campaign. The name you give the UTM Campaign is completely up to you but we recommend using something that is easily identifiable because this is parameter is going to be used to identify all the URLs in the campaign.
In our situation we will name our UTM Campaign = EverythingIsFREE
Next step is to add all of the materials you would like to associate with the campaign to the Content Inventory. This includes any content or pages from your site, emails or any external promotional channels. In our situation we would like to include social media links as well as pages from our website. We would then use the URL builder and add UTM Source and UTM Medium parameters to these links. A Twitter link for example would have a UTM Source = Twitter; UTM Medium = Social.
Once you have the content inventory organized you will then need to set up conversions for the campaign. These conversions will determine the success of the Campaign. You need a minimum of one conversion to run a campaign but you can add as many as you like. To add a conversion you can simply click Add Conversion in the Conversions section and open the Define Conversion dialog where you can select the type of visitor activity you would like to track. In our situation we would add a conversion for someone filling out a form to qualify to for our "Everything in the store is FREE" promotion.
After you have saved your conversions and defined your campaign you are now ready to schedule it to go live. This is done in the Schedule tab. You can stop your campaign at any time and add elements to the content inventory as the campaign is running. The campaign management application is also equipped with all the analytics you could need to analyze data quickly.
Having everything in one place is extremely convenient and having this built into the CMS makes making changes easy.
fig 1. Campaign Content
fig 2. Campaign Reports
Read More:
To learn more about campaign management see the following links:https://docs.kentico.com/k10/on-line-marketing-features/managing-your-on-line-marketing-features/campaigns
This Blog is the fourth in a series of posts outlining the benefits and features of Kentico's Enterprise Marketing System.
Content Personalization With Kentico
Marketing Automation With Kentico EMS
Author

Alex
Senior Project Manager
Alex has over 10 years of experience managing digital projects with a background in Psychology and Web Design.